Configure common command-line tools on Mac OS X January 29, 2009

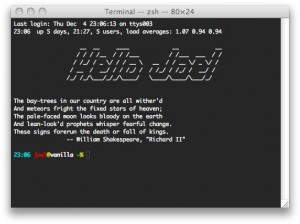
Even if you properly configured the Terminal application on your Mac, you may think that using it is difficult, and not intuitive at all. Indeed, with the default configuration for the common command-line tools, you won’t get syntax highlighting within vim, nor will you have a shell which facilitates your work, and so on. But since I started my journey in Mac universe after spending some time on Linux, I am used to configure some of these tools, and I simply decided to make my shell and my other command-line tools on my mac look like what I previously had in my Linux box.
So, let me tell you what I did to have really usable command-line tools on my Mac…
Updated
- Sunday, September 5, 2010: adapted the tutorial to Snow Leopard; incorporated Louis Romero’s idea about hiding /opt for the Finder; other minor changes.
For your information, I did all these things on Mac OS X Snow Leopard 10.6.4. Let’s get started!
Install MacPorts
First of all, I noticed that some of the tools I liked were missing on my Mac. Basically, every command-line tool can be difficult to find, and at the same time, you may want to use a package management system to manage such software. So I could choose between MacPorts, and Fink. Although Fink seemed more powerful (in fact, more Debian-like), I had the impression that there wasn’t any kind of active development on Fink at the time I wanted to install it. So I chose MacPorts.
MacPorts is rather handy in fact, since it will automatically fetch the sources of what you want to install, and compile them with the right options. By the way, that’s why the first thing you need to do even before installing MacPorts is to install Apple Developer Tools. You can find them on Apple’s Developer website.
MacPorts is not perfect, and I already experienced some compilation failures with it, but it works most of the time, and it’s rather straightforward. One of the things I regret when I remember Debian’s aptitude, though, is its advanced dependency management system; indeed, I think MacPorts’ one is very basic. But hey, nothing is perfect.
Anyway, I just installed MacPorts using the Snow Leopard “dmg” disk image. Just refer to the download page of MacPorts. I also encourage you to read the MacPorts Guide, which explains with more details how to install MacPorts properly and how to use it. But you can just skip the part called “MacPorts and the Shell”, and instead do the following in a Terminal window:
sudo sh -c 'echo "/opt/local/share/man" > /etc/manpaths.d/macports'
Also, you may want the /opt directory (where MacPorts lives) hidden in the Finder, like a lot of other system directories. Here’s how you do that:
Now, just make sure you quit the Terminal application and relaunch it. Let’s continue…
Install some tools with MacPorts
Once MacPorts is installed, you can easily install some useful tools. For the rest of this tutorial, you will just need to do the following:
The tools figlet and fortune are some fun tools, you will see later why we need them; par is very useful to wrap lines with vim, and wget can be used to fetch some files from the internet without using curl.
But for your information, here is the list of the other tools I usually install:
- convmv: to re-encode some filenames;
- nmap: to discover open ports on remote servers;
- irssi: an excellent text based IRC client;
- p7zip, pbzip2, unrar: compression utilities;
- potrace: to vectorize bitmap image files;
- pstree: to see in a fancy way the list of processes running on your Mac;
- signing-party: to help you sign some GnuPG keys;
- w3m: a text based web browser.
I also install the excellent text based mail client mutt, but this one is a little tricky; here is how you should install it:
It will install the right version of mutt with the right variants to enable everything that can be useful for normal email usage.
That’s it for MacPorts!
Hiding /opt created within the install process of MacPorts
Thanks for the tutorial! (still having some customizing problem with figlet, but the rest is fine!)
For my concern, the /opt folder wasn’t there before MacPorts install (I don’t know if it’s the only one to use it?).
In order to “clean” the all thing, I found two interesting issues:
1- I don’t like to see the whole content of /Developer and /opt in the Spotlight search. So I first recommend to get these two in the excluding list of Spotlight (System Preferences).
2- I looked a little bit to know how to hide /opt like /usr, /etc are.
In an OS X way, it’s not that bad! :-). Obviously, putting a . in front of the name is no solution… At all.
You’ll need the Developer Tools, but you are supposed to install them anyway if you want to use MacPorts.
In the Terminal.app of course, use the brand ‘new’ root user:
root@machine ~# SetFile -a V /opt
Basically, it’s switching a bit in the file, responsible for (in)visibility in the Finder. Usually, you have to reload the Finder, but I didn’t have to.
It’s nicer 🙂